3D Modeling Final Project

19/06/20- 26/07/20 (Week 10- Week 15)
Riyaz Mohamed Zain ( 0334031)
3D Modeling
Final Project
Riyaz Mohamed Zain ( 0334031)
3D Modeling
Final Project
LECTURE NOTES
Lecture 07
19/06/20 (Week 10)
We were given a lecture on using z remesher tool to reduce the poly count ad clean up the mesh. Must be careful to maintain a reasonable polycount in order to avoid crashing
Lecture 08
3/07/20 (Week 12)
we taught about how to use Zspheres, It is a tool that will effectively ease the construction of model blockout as it can be easily manipulated.
INSTRUCTIONS
EXERCISES
Week 10
19 June 2020
Final Project
Final Project
For the FInal project, Mr. Kannan decided to combine project 2 and the final project due to time constraints. To start off we need to come up with a simple concept and story for our character. I started by making some sketches. Initially, I had 2 ideas. 1 was to create a woman inspired by Maldivian culture and the second was a Shaolin red panda.
 |
| Fig 1.1 Idea 1 |
 |
| Fig 1.2 Idea 2 |
Week 11
26 June 2020
After consulting with Mr. Kanna I decided to go with my second idea. I began by doing more sketches to use as a reference before beginning my model.
 |
| Fig 2.1 Sketches |
After I got my idea finalized I started to make my block out in Zbrush.
 |
| Fig 2.2 Blockout |

 | |
|

Week 12
03 Jul 2020
Mr. Kannan told me that the posture of the model was not right and it looks unbalanced. So with this is in mind on to tweak my blockout. I decided to use Zspheres and it would be easier to pose and move around to get the right posture.
 |
| Fig 3.1 Zsphere blockout |

After I finished my Blockout I moved onto adding some details and muscle definition to the model.
 |
| Fig 3.3 Initial attempt |
My first attempt did turn out so well as the arms came a bit short.
Week 13
10 Jul 2020
I learned a lot trying to sculpt my previous model. I restarted my buildup process.
 |
| Fig 3.4 Detailing |

 |
| Fig 3.6 Face detail |

After looking at my design Mr. Kannan said that I was almost there but there were sill minute changes that need to be made. There were still issues with the muscles and the ears that needed to adjust. I quickly worked on smoothing adjusting the body but because I was already behind I moved on to adding clothes and finer details to the model.
I started off by adding a bandage to the hand. After extracting the required area I then split in into separate playgroups to resemble the wraps. After the playgroups were I added a poly loop to the sub tool to create the depths. Then I went around using the move tool to add more variation between each wrap.
 |
| Fig 3.8 Adding Polygroups to extracted subtool |

 |
| Fig 3.10 Final wrap. |
 |
| Fig 3.11 Leg wrapping using the same technique |
After extracting the area for the trousers I started to move and shape the details of the trouser. Using the brushes I added wrinkles to make it a little bit more realistic. Using the same methods I added more cloth pieces to give depth to the character's outfit.
 |
| Fig 3.12 Making trousers. |
 |
| Fig 3.13 Final clothes bottom |
After I was done with the clothes I moved onto adding facial details. I wanted to add some amount of fur to make it more panda like. But I didn't want to make it too realistic so I was careful to maintain the stylized look.
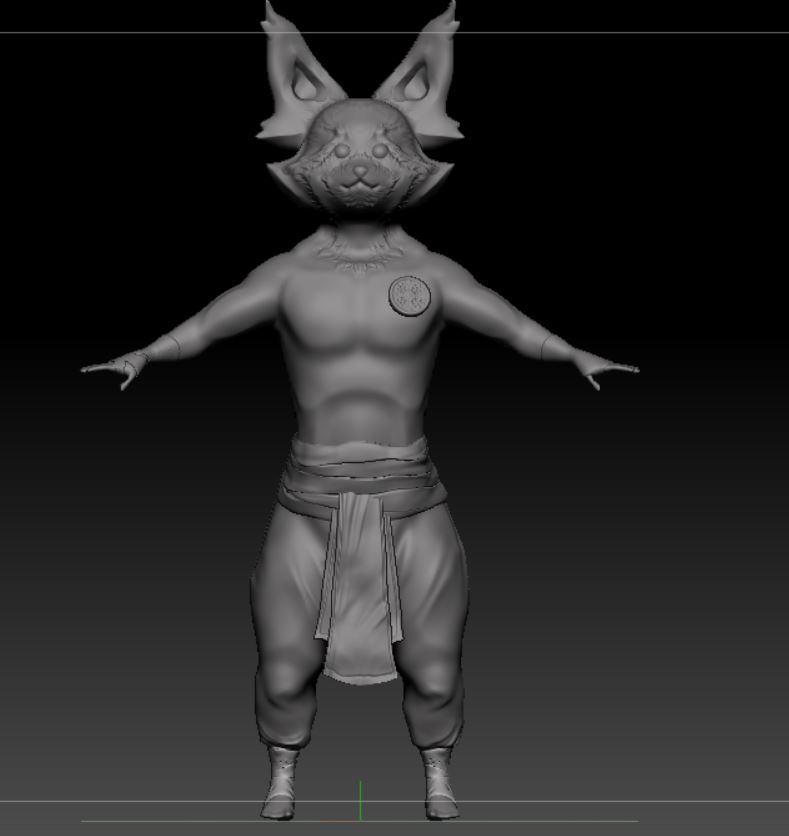 |
| Fig 3.14 Progress of the model |

Week 14
17 Jul 2020
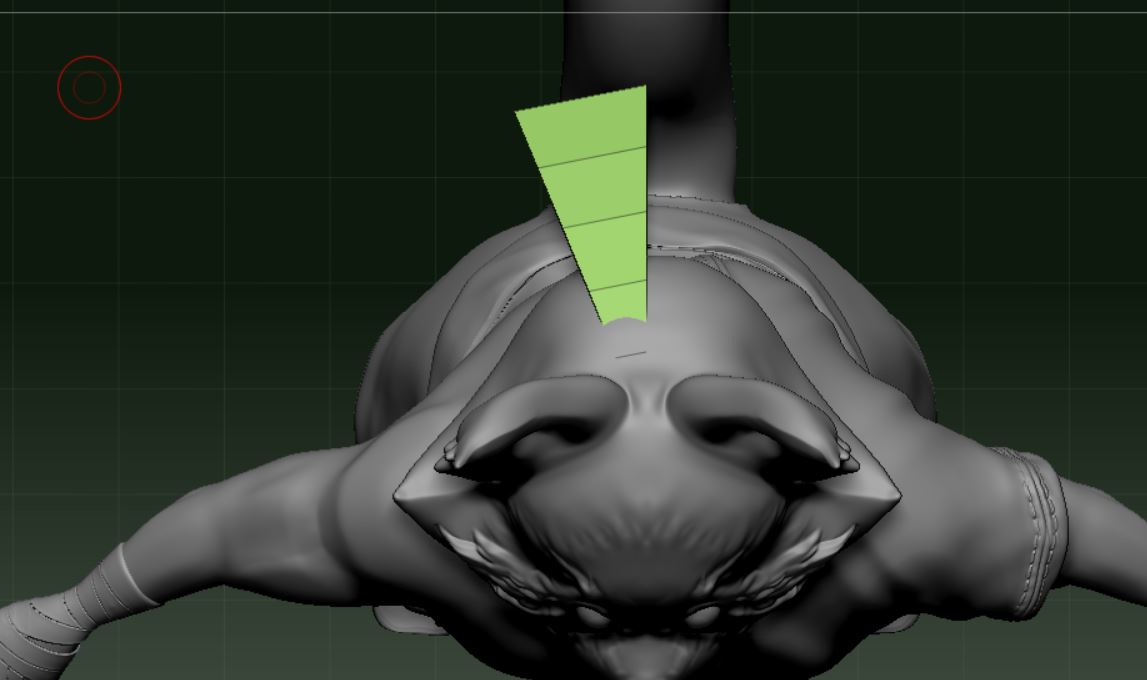
Mr. Kanna was happy with the design so far. He however commented on some details that were missing such at the eye socket details. He also mentioned that the abs are too low and need to be lifted up bit for proper anatomy. I began by making these adjustments.
 |
| Fig 4.1 Adding eyes socket details. |
 |
| Fig 4.2 Ammended body. |
Mr. Kannan had also suggested adding some Japanese slippers to the model. I really liked this idea so I went ahead did so.
 |
| Fig 4.3 Wooden slipper. |
After I finished this I was still not content with the clothing. I felt that The body still looked a little empty so I added a half-shirt onto the model. After extracting the shirt I added the fold and creases onto it. using a stick brush I made the sticking along the edges of the cloth.
 |
| Fig 4.4 Extracting the shirt |

I wanted to add some more elements to the models. I opted to add a straw hat as I thought it fit well with the persona of the character I was trying to show.
I started by creating a simple cone and then separating the playgroups using the modeler tool. I then deleted the interior of the cone to form the hat shape. After deleting the unnecessary loops I then deleted the segments of the cone leaving only one segment.
 |
| Fig 4.6 Cone subtool |

 |
| Fig 4.8 deleting unnecessary segments. |
I used the array mesh to create rotational duplicates of these segments. This way any adjustments I make to one segment will be reflected all the others.
 |
| Fig 4.9 Array Mesh of the segment. |
After creating the array mesh I made details using the Zmodeler tool by extruding areas with the segments.
 |
| Fig 4.10 Detailing the hat. |
After I finished detailing the hat I made A duplicate of the cone I had previously. This would act as the wooden support that goes around a straw hat. Using the Zmodeler tool I created poly loops and separated them into different playgroups. After this, I then isolated and deleted the polygroups I didn't need.
 |
| Fig 4.11 Adding poly loops |
 |
| Fig 4.12 Deleting Unnecessary segments |
Then I smoothed the subtool by adding division to it. In order to preserve the edges, I kept the dynamic subdivisions on and later applied them.
 |
| Fig 4.13 Smoothing the lines |
 |
| Fig 4.14 Progress of Hat |
The last step was to add some straws sticking out of the hat. In order to activate these effects, I simply used a duplicate of the array meshed cone I made previously. Onto this using the Z model toll I added some poly loops and isolated the segments.
 |
| Fig 4.15 Adding Polyloops. |
 |
| Fig 4.16 Deleted isolated segments. |
After I got the shape using the move tool I adjusted some of the straws to add some bends and give it a more natural look.
 |
| Fig 4.17 Final hat |
Week 15
24 Jul 2020
Mr. Kannan said that It would be nice to see a balance on the other end. He suggested that I add something to the other arm. Since I already had a lot of elements in the model I decided to add something small. In this case, I opted to make a small armband.
 |
| Fig 5.1 Armband |
The last item now was a weapon. since my character is peaceful had planned to give it a simple staff. I used the Zspere to construct the lockout and added wood details using the pinch tool. I also added a warping around the staff to match the clothing style of the character.
 |
| Fig 5.2 Staff. |
 |
| Fig 5.3 Wood detail and cloth wrap. |
Here is the final model in Zbrush
 |
| Fig 5.4 Final Model in Zbrush |
 |
| Fig 5.5 Final Model. |
After finishing the model I quickly moved to retopology. Mr Kannan told me that it was not necessary to retopology for each and every subtool if the poly count was not too high. So I used ZBrush to create a low poly for some of the subtools. I only used Topogun for the ones that were necessary.
 |
| Fig 5.6 retopology in topgun |
After I finished my retopology of all the sub tools I moved onto Maya to make the UV meshes and bake the model. Despite several attempts to bake my model in Maya kept crashing. I told Mr. Kannan about the issue and he told me to try using ZBrush instead to bake. So I moved back onto Zbrus to make. I tried to move my Uv maps from Maya but I had trouble linking it. So instead I used Uv Master in ZBrush to do so.
 |
| Fig 5.7 UV seams. |
 |
| Fig 5.8 UV map of the body. |
After I created the UV maps for all the subtools I moved onto baking the normal maps for them. After I exported the fbx file for each subtool I used Maya to merge them into one obj to be imported into Substance painter.
 |
| Fig 5.9 Adding materials on substance painter |
Here is the final render of the Shaolin Panda.
 |
| Fig 5.10 Final render |

 | |
|

 | |
|
 |
| Fig 5.15 Final Poster. |


Comments
Post a Comment